ssh

生成ssh密钥对

1
ssh-keygen -t rsa -C 'xxx@xxx.com'

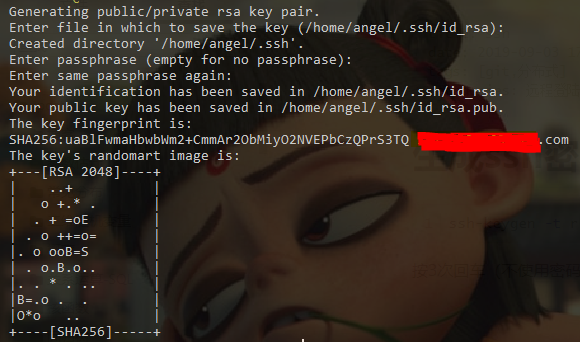
按3次回车(不使用密码)生成下图。密钥对在~/.ssh文件夹中,将id_rsa.pub(公钥)提交到github或者gitlab中

1568460515778

安装ssh

1
2
sudo apt-get install openssh-client  #客户端 类似于xshell,登陆服务器
sudo apt-get install openssh-server #服务端 用于服务器,让其他客户端远程登陆

远程登陆服务器

shell脚本远程自动登陆服务器

目前远程登陆服务器一般需要1. 登陆跳板机;2. 登陆服务器。

  1. ssh跳板机->输入静态密码+token码
  2. 在跳板机ssh服务器->输入密码

解决方法

1
sudo apt-get install expect   #安装expect

在expect中写入,不同公司的登陆流程不一样,需要修改登陆流程。但是登陆模板如图所示。其中set是设置变量;expect是设置返回的字符串;send是发送的字符串。

1
2
3
4
5
6
7
8
9
10
11
12
13
14
15
16
17
18
19
20
21
22
23
24
25
26
27
28
29
30
31
32
33
34
35
36
#!/usr/bin/expect

set salt [lindex $argv 0] #跳板机的token码
set username 跳板机地址
set password 跳板机静态密码
set serverIP 服务器IP地址
set server 服务器地址
set serverpass 服务器密码
spawn ssh "$username"
expect {
"*yes/no*" { #如果遇到yes/no输入yes
send "yes\n";
exp_continue;
}
"*Password:" { #如果遇到Password
send "$password $salt\n"; #静态密码+' '+token密码
exp_continue;
}
"Please input server keyword" { #输入服务器IP地址
send $serverIP;
exp_continue;
}
"Select account" { #选择账户
send "powerop\r";
exp_continue;
}
"server" { #从跳板机ssh服务器
send "ssh $server\r";
exp_continue;
}
"*password:" { #输入服务器密码
send "$serverpass\r";
exp_continue;
}
}
interact